How To Can Blackberry Jam
Interested in learning how to can blackberry jam? Good! This was the first thing I learned to can and I have canned many a jar of jam since. I’m happy to share the step by step process of how to can blackberry jam with you.
This is one of the frugal things I am learning to do – can my own food. Growing up, I remember my Mom canning and my Grandma’s did as well.

This post may contain affiliate links. As an Amazon Associate, I earn from qualifying purchases. You can read more in my disclosure policy.
I was a bit nervous about the canning process at first but it really is very simple to do! I think canning jam is the perfect first canning recipe because anyone can do it.
The important thing to remember in any canning recipe is not to tweak the measurements, for food safety reasons. Always use a tried and true canning recipe like this one from the Ball book of canning.
Canning jam doesn’t require fancy equipment. You can actually make freezer jam that is also delicious. I prefer canning my jam so I can store it in the pantry without taking up freezer space. To do so, you need a water bath canner. A water bath canner is simply a large pot in which you can cover your canning jars with boiling water. Water bath canners are reasonably priced and a good investment if you plan to can regularly (and by regularly, even a couple times a year makes it a good investment in my book).
Ready to can some homemade jam?
Here’s how to can blackberry jam.
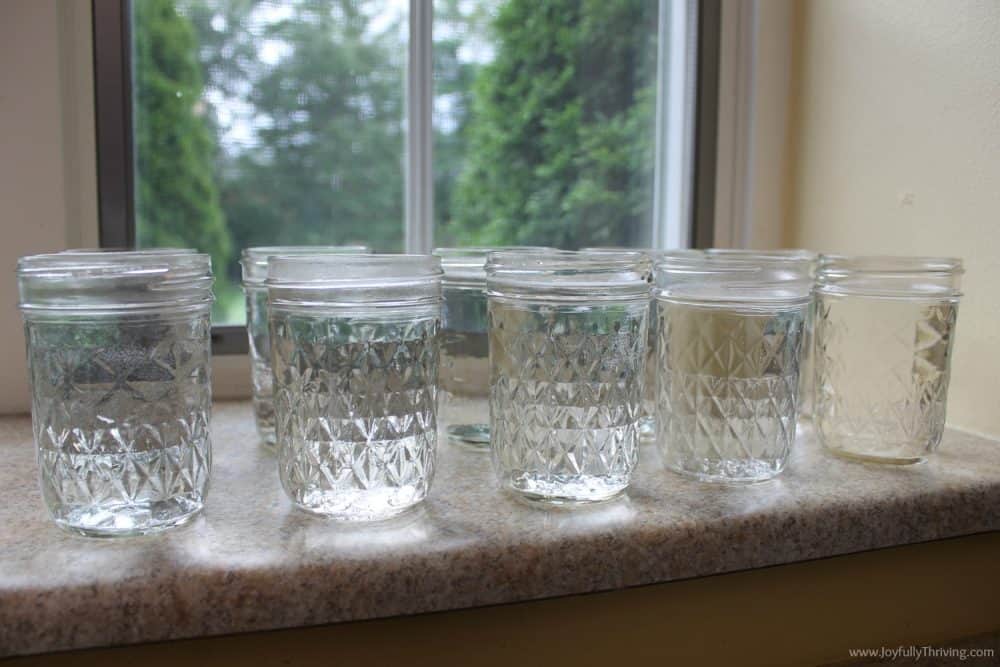
Start by preparing your canning jars.
Gather all your Ball canning jars and wash them in hot water. You can also sterilize them by washing them in your dishwasher if you plan on making several batches of jam in one day.
Canning jars come in many sizes. Half pint jars are the perfect size for jam. I use pint jars for salsa and quart jars for applesauce. You can decide on the size of jars that you would like to use. Half pint or smaller are really the best size for jam. These are the jars I use when canning jam although I know some prefer these 4 ounce size jars for jam, especially if you plan to gift some of it.
Now, you need to fill your clean jars with hot water to stay warm. This is very important because your jam will be warm when you fill your jars. If you put warm jam in a cold jar and submerge it in hot water, your jar will not seal properly and could very well crack.
You could fill them with boiling water from a teapot on the stove. I improvise. I turn my tap water as hot as it can go. It is almost boiling at this point. Then, I fill my jars with this scalding water and place the jars carefully on the counter to stay warm while I make the jam.
Finally, fill your water bath canner with hot water. Cover and bring to a simmer. At this point, I make sure my jar rack is hooked on the sides of the water bath canner and waiting for me to set the jars on it. Your wire rack that comes with most canners will have obvious ridges where you can hook it on.
The final thing you need to do is boil your lids and jar bands. I pour some hot water in a large glass bowl and drop my lids and jar bands in there until I am ready to use them.
Now, it’s time to make your blackberry jam.
First, gather your blackberries. To make one batch of blackberry jam, you will need 5 cups of crushed berries. That is approximately 3 pounds of berries or 8 cups of blackberries, if you were wondering. We have a member at church with blackberry bushes so when she calls with extra berries that need to be picked, I hurry over there for free blackberries!
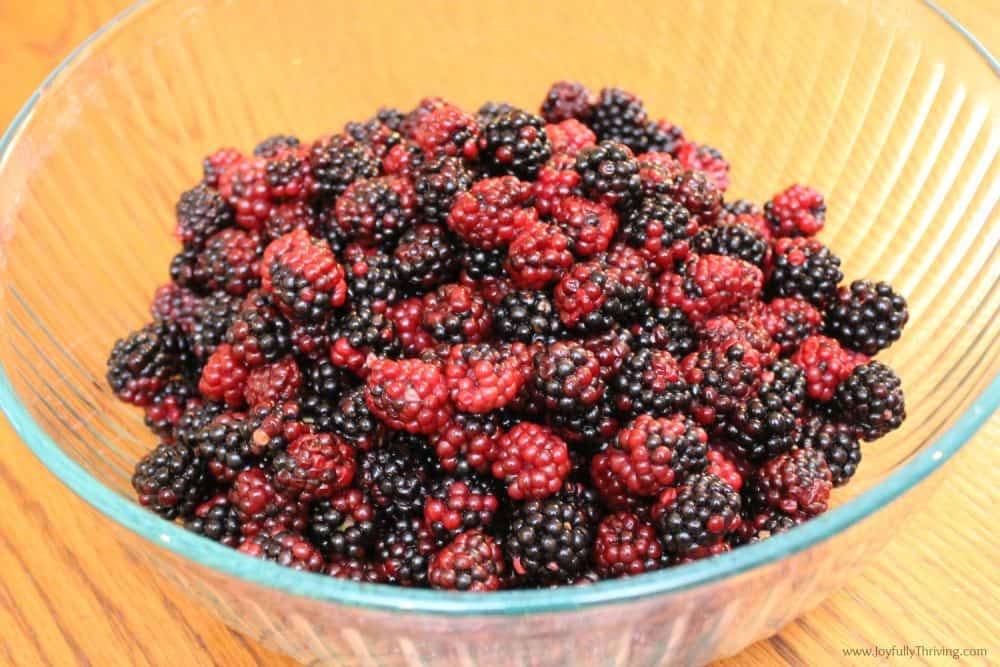
Once you have your blackberries, deal with them as soon as possible. Wash your berries gently under cool water. Then, smash your blackberries with a potato masher or a sturdy metal spoon. It won’t take long and it doesn’t have to be a perfect puree. Some blackberry chunks are actually good!
Carefully dump your smushed berries and juice into a large pan on the stove. Stir in 1 package (1.75 ounce) package of fruit pectin. This helps it maintain the sweet, fresh flavor of your fruit. Bring jam mixture to a full rolling boil that cannot be stirred down, over high heat, stirring constantly.
Next, stir in seven cups of sugar. Yes, seven is correct. I know it is a lot but your jam will be delicious! Remember, it is very important that you don’t mess with the proportions in any canning recipe, for food safety reasons. It is also recommended that you do not double canning recipes for the same reason. If you want to make two batches of jam, simply make one after another so nothing happens with your proportions. If you want to make low sugar jam, follow a recipe specifically for that and buy low-sugar pectin instead.
Return jam to a full roiling boil. Boil hard for 1 minute, stirring constantly. Remove jam from heat. Skim foam if necessary or desired.
Now it is time to can your blackberry jam.
The best thing I did this year was to purchase a canning funnel. It fits perfectly into all sizes of canning jars and makes filling my jars a breeze! Before I had this funnel, I spilled everywhere. Thanks to this handy canning funnel, my canning is much neater now. It’s a simple canning investment that is worth the money spent.
Dump the hot water out of your clean canning jars and put an empty jar on the counter. Place the canning funnel in the jar and fill it with hot blackberry jam. I like to use a ladle for this part.
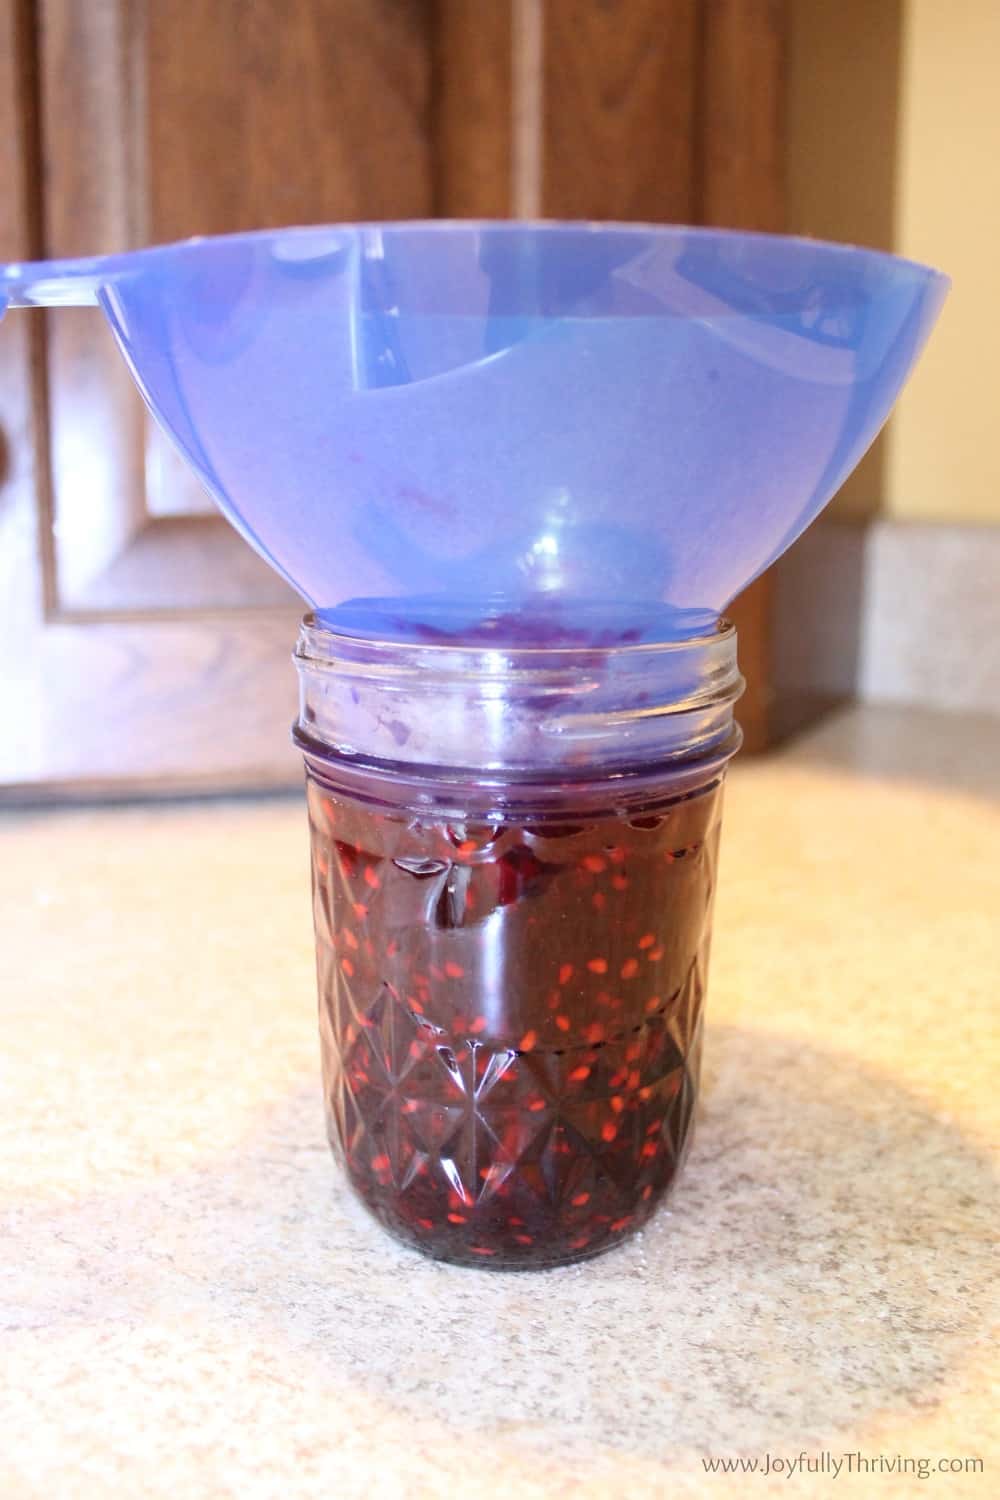
Fill your jam carefully leaving 1/4 inch headway. Hint: This is marked by the top line where your lid screws on. I tend to leave closer to one inch, right where the curves begin.
Once the jar is filled, remove the funnel. Using a damp paper towel, wipe the inside and outside lip of your jar.
Remove a lid and ring from the hot water. If you have a magnetic lid wand, you won’t burn your fingers! This is another great canning invention. Place the lid on top of your jar and screw the canning ring.
Carefully place your jar into your hot water bath canner on the wire rack. Repeat the process until all your jars and / or your canner is filled.
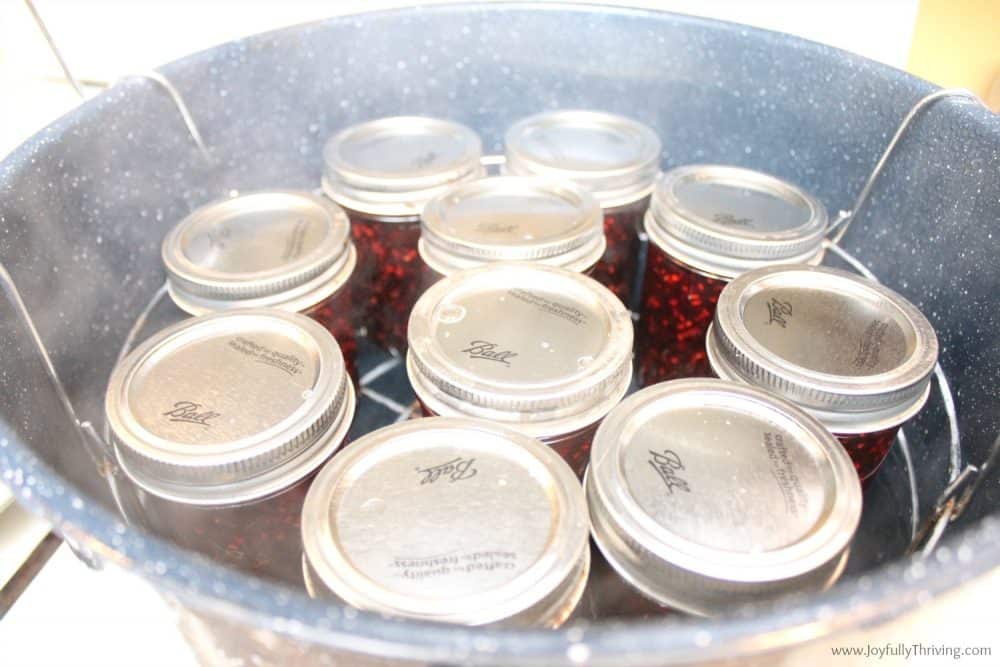
If you are using a water bath canner, you will have a wire rack that you can lower your jars into the warm water. After you lower the wire rack to the bottom, add boiling water to your canner until there is 1 to 2 inches of water above the lids of the jars.
Cover the canner and return water to a boil. Boil for 10 minutes. Do not start counting your 10 minutes until the water is at a full and steady boil.
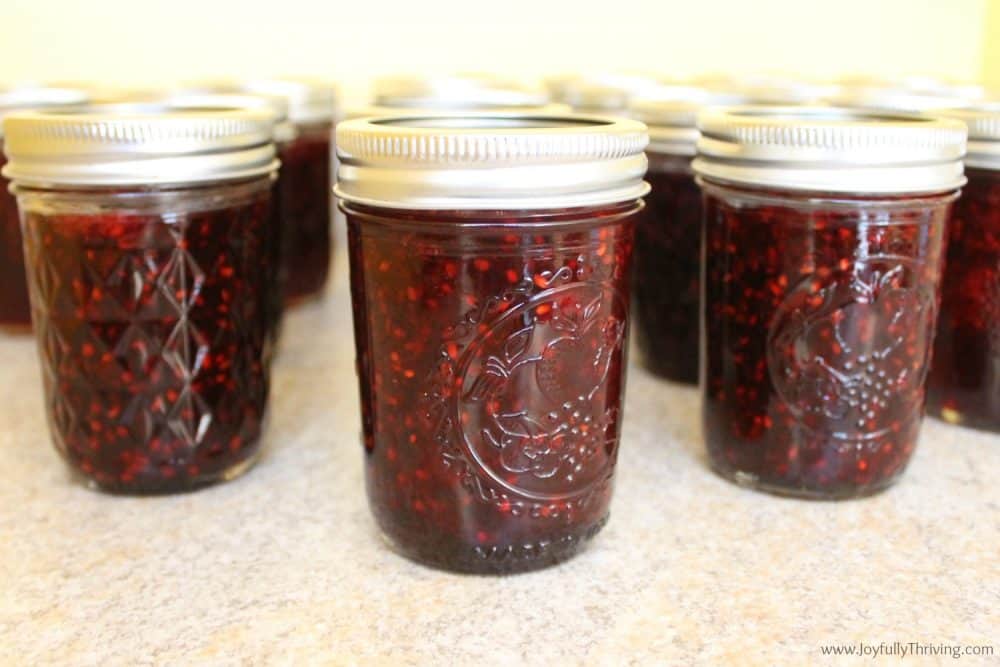
Turn off the burner heat. Remove water bath lid and allow jars to cool in the canner. After 5 minutes, carefully remove the jars and place on a towel to cool. With all the steam still there, I use my jar lifter tool so I don’t burn my fingers. You probably should buy a canning tools set like this one if you plan to can even a couple times a year. You will be glad you have these handy tools. You will probably hear a popping sound as the lids seal. That is normal and a good sign that you have canned correctly.
Leave your jars to cool for 12 to 24 hours. Do not disturb them. I know it’s hard to be patient, but you need to be! At the end of 24 hours, press down lightly in the center of each lid. If if does not give, your jar has sealed properly. At this point, tighten the bands on your jar and label your jam.
See how easy it is?
You now know how to can blackberry jam!
Enjoy opening a jar of this delicious, homemade, frugal goodness and savor the taste on warm bread. Bonus points if your bread is homemade!
Canning really is simple, frugal and fun. Have you canned anything recently?
For further instructions on canning, I highly recommend the Ball Blue Book Guide to Preserving. It is the ultimate how-to canning book with clear directions on how to can hundreds of different things like fruits, vegetables, jams, salsas and countless other things.
Want more easy & delicious recipes?
Sign up for our newsletter & get your free recipe book!
How To Can Blackberry Jam

Interested in canning blackberry jam? It’s very simple! Follow these step by step directions for how to can blackberry jam.
Ingredients
- 8 cups blackberries, smushed
- 7 cups sugar
- 1.75 ounces of fruit pectin
- Canning jars
- Water bath canner
Instructions
- Start by preparing your canning jars. Gather all your Ball canning jars and wash them in hot water. Fill your clean jars with hot water to keep them warm as you make the jam.
- Fill your water bath canner with hot water. Cover and bring to a simmer on the stove.
- Boil your lids and bands, allowing them to sit in hot water as you make the jam.
- Gather and gently wash your blackberries. To make one batch of blackberry jam, you will need 5 cups of crushed berries. That is approximately 3 pounds of berries or 8 cups of blackberries.
- Smash your blackberries with a potato masher or a sturdy metal spoon. It won’t take long and it doesn’t have to be a perfect puree. Some blackberry chunks are actually good!
- Carefully dump your smushed berries and juice into a large pan on the stove.
- Stir in 1 package (1.75 ounce) package of fruit pectin. Bring jam mixture to a full rolling boil that cannot be stirred down, over high heat, stirring constantly.
- Stir in seven cups of sugar. Return jam to a full roiling boil. Boil hard for 1 minute, stirring constantly. Remove jam from heat. Skim foam if necessary or desired.
- Pour the hot water out of your clean canning jars and put an empty jar on the counter. Place the canning funnel in the jar and fill it with hot blackberry jam.
- Fill your jam carefully leaving 1/4 inch headway. Hint: This is marked by the top line where your lid screws on. I tend to leave closer to one inch, right where the curves begin.
- Once the jar is filled, remove the funnel. Using a damp paper towel, wipe the inside and outside lip of your jar.
- Remove a lid and ring from the hot water. Place the lid on top of your jar and screw the canning ring.
- Carefully place your jar into your hot water bath canner on the wire rack. Repeat the process until all your jars and / or your canner is filled.
- Lower your jars into the warm water. After you lower the wire rack to the bottom, add boiling water to your canner until there is 1 to 2 inches of water above the lids of the jars.
- Cover the canner and return water to a boil. Boil for 10 minutes. Do not start counting your 10 minutes until the water is at a full and steady boil.
- Turn off the heat. Remove water bath lid and allow jars to cool in the canner. After 5 minutes, carefully remove the jars and place on a towel to cool.
- Leave your jars to cool for 12 to 24 hours. Do not disturb them. At the end of 24 hours, press down lightly in the center of each lid. If if does not give, your jar has sealed properly. At this point, tighten the bands on your jar and label your jam.
- Enjoy your delicious homemade blackberry jam!
Nutrition
- Serving Size: 1
What is the yield? Do we need a dozen jars or a gross?
How smushed is “smushed” berries — rolled flat? potato-masher-mashed?
Thank you!
This yields about 6-7 half pint (jam) size jars. The berries do not need to be completely smushed unless you want to make jelly. Some lumps and texture are good…and they will cook down further as you prepare them!
My go to jam recipe!
★★★★★
I used 10 cups of smashed berries and 12 cups of sugar. After bringing to a soft boil, I strained out about 80% of the seeds. I brought it back to a hard boil, and turned off the heat when the mixture reached 220 degrees. It made exactly 12 half-pint jars. Thanks for the recipe.
Thank you. I really appreciate this information. My husband’s granny made seedless jam – not jelly. Now I can do this for him.
★★★★
I’m not canning this season, but my mom recently blessed me with a lot of strawberry and raspberry freezer jam! YUM! I normally do some peaches, pears, applesauce, and a couple tomato products..normally chunk tomatoes or pizza sauce.
Oh, good! With baby due to arrive so soon, you don’t have time to be canning! 🙂 Praying that these final days and weeks of waiting are smooth ones! I can’t wait to hear your good news!
People think I’m weird when I tell them I never knew as a kid that you bought food in cans at the store. My grandfather had a 7 acre garden so all my vegetables as a kid came in mason jars! I remember sitting on the porch snapping and shelling the days supply of food. I watched Granny can it and my mom helped. I have just recently gotten into canning. I made peach preserves for the first time last summer!! They were marvelous!! This summer I canned some more peach preserves, made strawberry preserves, homemade sweet pickles and canned tomatoes! It was so much fun!! I am so looking forward to having a garden next year! I will be canning a bunch of stuff next year (God willing the garden produces well). I have a co-worker that offered me blackberry bushes (this fall). I will be saving this recipe to make my own jam!! Thanks for sharing!!
Good luck to you! My Grandma and Mom canned too so it’s fun to carry on that tradition. Good for you in canning so many things already! And here’s hoping next year’s garden (and blackberry bushes!) produce well!
I use Pamona’s Universal Pectin for lower sugar jam. It works very well. I find it at health food stores. I have not seen it in a main stream market yet.
I’ve never heard of that. I’ll have to keep my eyes open for it! Thanks for sharing, Sara!
Someone just gave me three gallons of blackberries. I’m going to try your jam out! Many thanks for the recipe!
Oh, the pictures need updating…but the recipe is a delicious one! It’s my favorite recipe for blackberries. Happy canning, Adriane!
Great directions! I’ve never canned before, and made my first batch tonight. You made this very non-intimidating.
It made nearly 5 full pint jars. Wish I could post a photo!
Thanks, Melissa! I just canned 31 jars myself earlier this week. I hope you enjoy eating your freshly canned jam!
Jen, I have been looking for a recipe . I am new to canning and the blackberries are about to come on with a vengeance and I can’t pass them up. My first attemp at canning was just this year when the sour cherries were ready, also in abundance, with cherry pie filling. It is so good! This recipe sounds like just what I was looking for. Can u please tell me what kind of yield this recipe has?
Oh, the joy of having an abundance of fresh fruit to can! One recipe makes around 7 or 8 pints of jam. Happy canning to you!
I’ve been looking on line for instructions like these for days and yours are by far the best. I’m picking my berries tonight and making Jam tomorrow. Thank you so much!
You are welcome! I’m glad I could be of help. Happy berry picking and jam making, Jen!
Thank you so much for these instructions, they were very helpful. The pictures were great for us visual learners. Absolutely going to try this soon.
I’m glad it was helpful, Jayme. It really isn’t that hard, and tastes delicious. Good luck to you!